Thursday 6 February 2014

Android: Custom EditText (TextArea) with custom Background

In this example I will show how to create custom background with custom EditText  (TextArea). The final result you can see in the picture.
The background is downloaded from background textures. Text area is surrounded with black color and in the bottom is a counter how many characters user still can enter. 
When the user hits SHOW button the Toast displays entered text.


import android.os.Bundle;
import android.support.v4.app.Fragment;
import android.text.Editable;
import android.text.TextWatcher;
import android.view.LayoutInflater;
import android.view.View;
import android.view.View.OnClickListener;
import android.view.ViewGroup;
import android.widget.Button;
import android.widget.EditText;
import android.widget.TextView;
import android.widget.Toast;

/**
 * @author Peter.Gostincar
 *
 */
public class MainFragment extends Fragment {

 private int mMaxCount;
 private EditText mText;
 private Button mButtonShowText;
 private TextView mCounter;
 private String mFinalText;

 @Override
 public void onCreate(Bundle savedInstanceState){
  super.onCreate(savedInstanceState);
  mMaxCount = Integer.parseInt(getString(R.string.max_value));
 }


 @Override
 public View onCreateView(LayoutInflater inflater, ViewGroup parent, Bundle savedInstanceState){
  View v = inflater.inflate(R.layout.fragment_main, parent, false);
  mText = (EditText) v.findViewById(R.id.custom_text_view);
  mCounter = (TextView) v.findViewById(R.id.counter);
  mButtonShowText = (Button) v.findViewById(R.id.button_show);
  setListeners();
  return v;
 }


 /**
  * 
  */
 private void setListeners() {
  mText.addTextChangedListener(new TextWatcher() {
   @Override
   public void onTextChanged(CharSequence s, int start, int before, int count) {}
   @Override
   public void beforeTextChanged(CharSequence s, int start, int count, int after) {}
   @Override
   public void afterTextChanged(Editable s) {
    int strLenght = s.toString().length();
    int available = mMaxCount - strLenght;
    setAvailableSpace(available);
    if(available < 0){
     s.delete(strLenght-1, strLenght);
    }
    mFinalText = s.toString();
   }
  });

  mButtonShowText.setOnClickListener(new OnClickListener() {
   @Override
   public void onClick(View arg0) {
    Toast.makeText(getActivity(), mFinalText, Toast.LENGTH_SHORT).show();
   }
  });
 }

 protected void setAvailableSpace(int available) {
  mCounter.setText(available + "");
 }
}


We put this file (border.xml) into res/drawable  folder
<shape xmlns:android="http://schemas.android.com/apk/res/android"
    android:shape="rectangle" >
    <solid android:color="#ffffff" />

    <stroke
        android:width="1dp"
        android:color="#000000" />

</shape>


We put this file (repeating.xml) into res/drawable  folder
<?xml version="1.0" encoding="utf-8"?>
<bitmap xmlns:android="http://schemas.android.com/apk/res/android"
    android:src="@drawable/nistri" 
    android:tileMode="repeat"/>
Nistri is the name of the image copied into drawable folder.


We put this file (fragment_main.xml) into res/layout folder
<?xml version="1.0" encoding="utf-8"?>
<LinearLayout xmlns:android="http://schemas.android.com/apk/res/android"
    android:layout_width="fill_parent"
    android:layout_height="fill_parent"
    android:background="@drawable/repeating"
    android:orientation="vertical" >

    <RelativeLayout
        android:layout_width="wrap_content"
        android:layout_height="wrap_content"
        android:padding="15dp" >

        <EditText
            android:id="@+id/custom_text_view"
            android:layout_width="match_parent"
            android:layout_height="150dp"
            android:background="@drawable/border"
            android:gravity="top"
            android:hint="Enter text"
            android:padding="2dp" />

        <TextView
            android:id="@+id/counter"
            android:layout_width="wrap_content"
            android:layout_height="wrap_content"
            android:layout_alignBottom="@id/custom_text_view"
            android:layout_alignRight="@id/custom_text_view"
            android:padding="5dp"
            android:text="@string/max_value"
            android:textColor="@color/counter" />
    </RelativeLayout>

    <RelativeLayout
        android:layout_width="match_parent"
        android:layout_height="wrap_content"
        android:padding="15dp" >

        <Button
            android:id="@+id/button_show"
            android:layout_centerHorizontal="true"
            android:layout_width="wrap_content"
            android:layout_height="wrap_content"
            android:text="SHOW" />
    </RelativeLayout>

</LinearLayout>

Friday 31 January 2014

Android : Properly rotated image (Landscape or Portrait)

I've been struggling for a few hours, how to rotate properly image after it's been taken trough Android app (Camera Intent).
I assume that this code example will be in some help for you also.
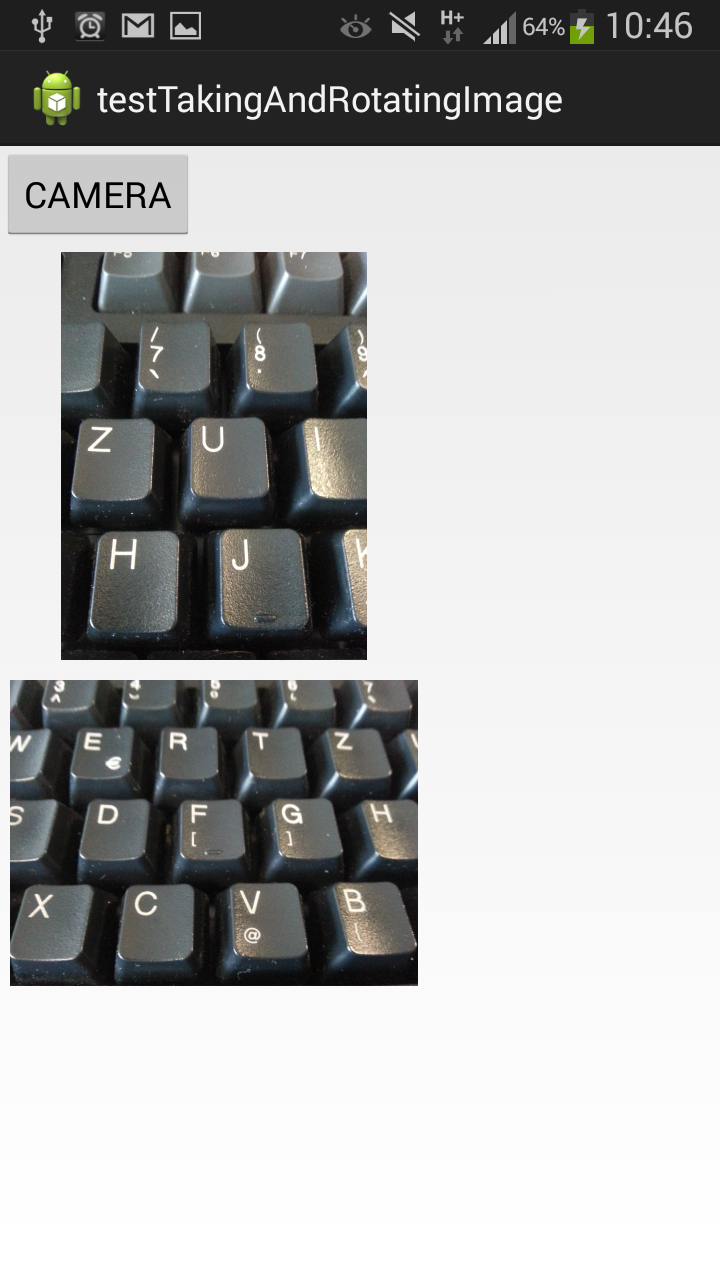
In the picture we can see one photo made in portrait mode and one in landscape mode. The both pictures are properly rotated, which is impossible with out additional fixing.


package com.example.testtakingandrotatingimage;

import java.io.File;
import java.text.SimpleDateFormat;
import java.util.Date;
import java.util.List;

import android.app.Activity;
import android.content.Intent;
import android.content.pm.PackageManager;
import android.content.pm.ResolveInfo;
import android.content.res.Resources;
import android.graphics.Bitmap;
import android.graphics.BitmapFactory;
import android.graphics.Matrix;
import android.media.ExifInterface;
import android.net.Uri;
import android.os.Bundle;
import android.os.Environment;
import android.provider.MediaStore;
import android.support.v4.app.Fragment;
import android.support.v4.app.FragmentActivity;
import android.view.LayoutInflater;
import android.view.View;
import android.view.View.OnClickListener;
import android.view.ViewGroup;
import android.widget.Button;
import android.widget.ImageView;
import android.widget.LinearLayout;
import android.widget.Toast;

/**
 * @author Peter.Gostincar
 *
 */
public class MainFragment extends Fragment {

 
 private Uri mPictureFileUri;
 private static final int REQUEST_PHOTO = 0;
 private LinearLayout imageHolder;


 @Override
 public View onCreateView(LayoutInflater inflater, ViewGroup parent, Bundle savedInstanceState){
  View v = inflater.inflate(R.layout.fragment_main, parent, false);

  imageHolder = (LinearLayout) v.findViewById(R.id.image_holder);

  Button c = (Button) v.findViewById(R.id.take_image);
  c.setOnClickListener(new OnClickListener() {
   @Override
   public void onClick(View arg0) {
    takePicture();
   }
  });
 
  return v;
 }


 @Override
 public void onActivityResult(int requestCode, int resultCode, Intent data){
  if(resultCode != Activity.RESULT_OK)
   return;
  if(requestCode == REQUEST_PHOTO){
   Bitmap image = rotateImage(mPictureFileUri);//rotate if necessary 
   showImageOnLayout(image);//show
  }
 }

 
 /**
  * 
  */
 protected void takePicture() {
  mPictureFileUri = Helpers.getGlobalPictureFileUri(getActivity());
  //is intent available & is mPictureFileUri created (is there space...)
  if((mPictureFileUri != null) && Helpers.
    isIntentAvailable(MediaStore.ACTION_IMAGE_CAPTURE, getActivity())){

   // create Intent to take a picture and return control to the calling application
   Intent intent = new Intent(MediaStore.ACTION_IMAGE_CAPTURE);
   intent.putExtra(MediaStore.EXTRA_OUTPUT, mPictureFileUri);
   startActivityForResult(intent, REQUEST_PHOTO);
  }
  else {
   Toast.makeText(getActivity(), "something wrong under the hood", 
     Toast.LENGTH_SHORT).show();
  }
 }
 

 /**
  * 
  * @param image
  */
 private void showImageOnLayout(Bitmap image) {
  ImageView tmpImage = new ImageView(getActivity());
  tmpImage.setImageBitmap(image);
  tmpImage.setPadding(10, 10, 10, 10);

  ((ViewGroup) imageHolder).addView(tmpImage);
 }


 /**
  * here is the magic
  * @param uri
  * @return
  */
 private Bitmap rotateImage(Uri uri) {
  Bitmap image = Helpers.decodeSampledBitmapFromResource(getResources(), 
    uri.getPath(), 200, 200);
  try {
   Matrix matrix = new Matrix();

   ExifInterface exifInterface = new ExifInterface(uri.getPath());
   int rotation = exifInterface.getAttributeInt(ExifInterface.TAG_ORIENTATION,
     ExifInterface.ORIENTATION_NORMAL);
   switch(rotation){
    case ExifInterface.ORIENTATION_NORMAL:{
     break;
    }
    case ExifInterface.ORIENTATION_ROTATE_90:{
     matrix.postRotate(90);
     image = Bitmap.createBitmap(image, 0, 0, image.getWidth(), image.getHeight(), 
       matrix, true);
     break;
    }
    case ExifInterface.ORIENTATION_ROTATE_180:{
     matrix.postRotate(180);
     image = Bitmap.createBitmap(image, 0, 0, image.getWidth(), image.getHeight(),
       matrix, true);
     break;
    }
    case ExifInterface.ORIENTATION_ROTATE_270:{
     matrix.postRotate(270);
     image = Bitmap.createBitmap(image, 0, 0, image.getWidth(), image.getHeight(), 
       matrix, true);
     break;
    }
   }
  } catch (Exception e) {
   // TODO: handle exception
  }
  return image;
 }
}


class Helpers {
 
 private static final String MY_APPLICATION = "somepath";

 /**
  * 
  * @param mAppContext
  * @return
  */
 public static Uri getGlobalPictureFileUri(FragmentActivity mAppContext) {
  //To be safe, you should check that the SDCard is mounted
  // using Environment.getExternalStorageState() before doing this.

  if(!Environment.MEDIA_MOUNTED.equals(Environment.getExternalStorageState()))
   return null;

  File mediaStorageDir = new File(mAppContext.getExternalFilesDir(
    Environment.DIRECTORY_PICTURES) , MY_APPLICATION);

  if(mediaStorageDir.toString().equals(MY_APPLICATION))
   mediaStorageDir = new File(Environment.getExternalStoragePublicDirectory(
     Environment.DIRECTORY_PICTURES), MY_APPLICATION);

  // This location works best if you want the created images to be shared
  // between applications and persist after your app has been uninstalled.
  // Create the storage directory if it does not exist
  if (! mediaStorageDir.exists()){
   if (! mediaStorageDir.mkdirs()){
    return null;
   }
  }
  // Create a media file name
  String timeStamp = new SimpleDateFormat("yyyyMMdd_HHmmss").format(new Date());
  File mediaFile = new File(mediaStorageDir.getPath() + File.separator + "IMG_"+
    timeStamp + ".jpg");

  return Uri.fromFile(mediaFile);
 }


 /**
  * 
  * @param action
  * @param mAppContext
  * @return
  */
 public static boolean isIntentAvailable(String action, FragmentActivity mAppContext) {
  final PackageManager packageManager = mAppContext.getPackageManager();
  final Intent intent = new Intent(action);
  List list =
    packageManager.queryIntentActivities(intent, PackageManager.MATCH_DEFAULT_ONLY);
  return list.size() > 0;
 }
 
 
 /**
  * 
  * @param res
  * @param pathName
  * @param reqWidth
  * @param reqHeight
  * @return
  */
 public static Bitmap decodeSampledBitmapFromResource(Resources res, String pathName,
   int reqWidth, int reqHeight) {
  // First decode with inJustDecodeBounds=true to check dimensions
  final BitmapFactory.Options options = new BitmapFactory.Options();
  options.inJustDecodeBounds = true;
  BitmapFactory.decodeFile(pathName, options);
  // Calculate inSampleSize
  options.inSampleSize = calculateInSampleSize(options, reqWidth, reqHeight);
  // Decode bitmap with inSampleSize set
  options.inJustDecodeBounds = false;
  Bitmap bitmap = BitmapFactory.decodeFile(pathName, options);
  return bitmap;
 }

 
 /**
  * 
  * @param options
  * @param reqWidth
  * @param reqHeight
  * @return
  */
 private static int calculateInSampleSize(
   BitmapFactory.Options options, int reqWidth, int reqHeight) {
  // Raw height and width of image
  final int height = options.outHeight;
  final int width = options.outWidth;
  int inSampleSize = 1;

  if (height > reqHeight || width > reqWidth) {

   final int halfHeight = height / 2;
   final int halfWidth = width / 2;

   // Calculate the largest inSampleSize value that is a power of 2 and keeps both
   // height and width larger than the requested height and width.
   while ((halfHeight / inSampleSize) > reqHeight
     && (halfWidth / inSampleSize) > reqWidth) {
    inSampleSize *= 2;
   }
  }
  return inSampleSize;
 }
}


Thursday 21 November 2013

Android : Retrieve Json data from url

How to retrieve data as Json object from url in Android.
In this example when you click on the button and the system will retrieve data from url. For main Activity you can use the code from my other examples.
If there is something that is unclear, feel free to ask.


package com.example.testingdownload;

import android.os.AsyncTask;
import android.os.Bundle;
import android.support.v4.app.Fragment;
import android.view.LayoutInflater;
import android.view.View;
import android.view.ViewGroup;
import android.widget.Button;
import android.widget.TextView;

/**
 * @author Peter Gostincar
 */

public class MainFragment extends Fragment {
 
 private Button mCallButton;
 private TextView mTextView;
 private String mFetchedString;

 @Override
 public View onCreateView(LayoutInflater inflater, ViewGroup parent, Bundle savedInstanceState){
  View v = inflater.inflate(R.layout.fragment_main, parent, false);
  
  mTextView = (TextView) v.findViewById(R.id.view_text);
  
  mCallButton = (Button) v.findViewById(R.id.call_button);
  mCallButton.setOnClickListener(new View.OnClickListener() {
   @Override
   public void onClick(View v) {
    new FetchContent().execute();
   }
  });
  return v;
 }
 
 
 public void doUpdate() {
  if(getActivity() == null || mTextView == null)
   return;
  if(mFetchedString != null){
   mTextView.setText(mFetchedString);
  }
 }
 
 
 private class FetchContent extends AsyncTask {
  @Override
  protected String doInBackground(Void... params) {
   try {
    /** download data */
    return new Fetcer().retriveJsonData();
   } catch (Exception e) {
    // TODO: handle exception
   }
   return null;
  }

  @Override
  protected void onPostExecute(String result){
   mFetchedString = result;
   doUpdate();
  }
 }
}

package com.example.testingdownload;

import java.io.ByteArrayOutputStream;
import java.io.IOException;
import java.io.InputStream;
import java.net.HttpURLConnection;
import java.net.URL;
import org.json.JSONArray;
import org.json.JSONObject;
import org.json.JSONTokener;

/**
 * @author Peter Gostincar
 */

public class Fetcer {

 String url = "http://.../script_json.php (appended at the bottom)";
 private static final String JSON_ID = "id";
 private static final String JSON_NAME = "name";

 public byte[] getUrlBytes(String urlSpec) throws IOException{
  URL url = new URL(urlSpec);
  HttpURLConnection connection = (HttpURLConnection)url.openConnection();

  try {
   ByteArrayOutputStream out = new ByteArrayOutputStream();
   InputStream in = connection.getInputStream();

   if(connection.getResponseCode() != HttpURLConnection.HTTP_OK)
    return null;

   int bytesRead = 0;
   byte[] buffer = new byte[1024];
   while((bytesRead = in.read(buffer)) > 0){
    out.write(buffer, 0, bytesRead);
   }
   out.close();
   return out.toByteArray();

  } finally {
   connection.disconnect();
  }
 }

 
 public String retriveJsonData() {
  StringBuilder ret = new StringBuilder();
  try {
   String jsonString = (new String(getUrlBytes(url)));
   //Parse to json array
   JSONArray array = (JSONArray) new JSONTokener(jsonString.toString()).nextValue();
   for(int i = 0; i < array.length(); i++){
    JSONObject json = array.getJSONObject(i);
    ret.append(json.getString(JSON_NAME));
    ret.append(json.getInt(JSON_ID));
    ret.append(System.getProperty("line.separator"));
   }

   System.out.println();
  } catch (Exception e){
  }
  return ret.toString();
 }
}

activity_main.xml
<FrameLayout xmlns:android="http://schemas.android.com/apk/res/android"
    android:id="@+id/fragmentContainer"
    android:layout_width="match_parent"
    android:layout_height="match_parent"
    />


fragment_main.xml
<?xml version="1.0" encoding="utf-8"?>
<LinearLayout xmlns:android="http://schemas.android.com/apk/res/android"
    android:layout_width="match_parent"
    android:layout_height="match_parent"
    android:orientation="vertical" >


    <Button
        android:id="@+id/call_button"
        android:layout_width="wrap_content"
        android:layout_height="wrap_content"
        android:text="retrieve data" />


    <TextView
        android:id="@+id/view_text"
        android:layout_width="wrap_content"
        android:layout_height="wrap_content"
        android:text="do not forget to set Manifest -Network-" />


</LinearLayout>

<?php
$arr = array(
    array(
        "id" => "1",
        "name" => "Peter"
    ),
    array(
        "id" => "2",
        "name" => "Rok"
    ),
    array(
        "id" => "3",
        "name" => "Franci"
    )
);

echo json_encode($arr);
?>

Saturday 16 November 2013

Android : Zxing onActivityResult called only in Activity - How to show it in the Fragment - tutorial


In this example I'm showing how to send data from Activity to Fragment.
With app Zxing  via Intent we read the Barcode and that we represent it in the main Fragment. The Zxing app call onActivityResult() in Activity not in Fragment.


package com.example.testingcodereading;

import android.content.Intent;
import android.os.Bundle;
import android.support.v4.app.Fragment;
import android.support.v4.app.FragmentActivity;
import android.support.v4.app.FragmentManager;

public class MainActivity extends FragmentActivity {

  @Override
  protected void onCreate(Bundle savedInstanceState) {
    super.onCreate(savedInstanceState);
    setContentView(R.layout.activity_fragment);

    FragmentManager fm = getSupportFragmentManager();
    Fragment f = fm.findFragmentById(R.id.fragmentContainer);

    if (f == null) {
      f = MainFragment.newInstance("Start Application");
      fm.beginTransaction().add(R.id.fragmentContainer, f).commit();
    }
  }

  @Override
  protected void onActivityResult(int requestCode, int resultCode,
      Intent intent) {
    super.onActivityResult(requestCode, resultCode, intent);
    System.out.println("the code is catch");

    IntentResult scanResult = IntentIntegrator.parseActivityResult(
        requestCode, resultCode, intent);
    // handle scan result
    if (scanResult != null) {
      FragmentManager fm = getSupportFragmentManager();

      Fragment newFrame = MainFragment.newInstance(scanResult.toString());

      fm.beginTransaction().replace(R.id.fragmentContainer, newFrame).commit();
    }

  }

}

package com.example.testingcodereading;

import android.content.Intent;
import android.content.pm.ActivityInfo;
import android.content.pm.ResolveInfo;
import android.os.Bundle;
import android.support.v4.app.Fragment;
import android.test.suitebuilder.annotation.MediumTest;
import android.view.LayoutInflater;
import android.view.View;
import android.view.ViewGroup;
import android.widget.Button;
import android.widget.TextView;

public class MainFragment extends Fragment {

  private static final String EXTRA_CODE = "com.example.testingcodereading.code";
  private Button mButtonXZing;
  private TextView mTextView;

  public static MainFragment newInstance(String code) {
    Bundle args = new Bundle();
    args.putSerializable(EXTRA_CODE, code);

    MainFragment fragment = new MainFragment();
    fragment.setArguments(args);

    return fragment;
  }


  @Override
  public View onCreateView(LayoutInflater inflater, ViewGroup parent, Bundle savedInstanceState){
    View v = inflater.inflate(R.layout.fragment_main, parent, false);

    mTextView = (TextView) v.findViewById(R.id.text_code);
    mTextView.setText((String) getArguments().getSerializable(EXTRA_CODE));

    mButtonXZing = (Button) v.findViewById(R.id.button_xzing);
    mButtonXZing.setOnClickListener(new View.OnClickListener() {
      @Override
      public void onClick(View v) {

        IntentIntegrator integrator = new IntentIntegrator(getActivity());
        integrator.initiateScan();
      }
    });

    return v;
  }


  @Override 
  public void onActivityResult(int requestCode, int resultCode, Intent intent) {
    super.onActivityResult(requestCode, resultCode, intent);
    System.out.println("never here");
    IntentResult scanResult = IntentIntegrator.parseActivityResult(requestCode, resultCode, intent);
    if (scanResult != null) {
      // handle scan result
    }
    // else continue with any other code you need in the method
  }
}

Monday 4 November 2013

Android : Implementing long click tutorial

How to  to respond on a long click  in Android!
If you wanna the application to respond on a long click you have to implement Context Menu.
Here is an example how to create and register Context Menu.
Responding to an action is left empty to implement what needed.

I did use some code of the previous blog: Android : The scroll list. If you need the activity which started this frame go to this blog.

This is the result of the following code.


package com.mamutek.context.menu.android;

import java.util.ArrayList;

import android.os.Bundle;
import android.support.v4.app.ListFragment;
import android.util.Log;
import android.view.ContextMenu;
import android.view.ContextMenu.ContextMenuInfo;
import android.view.LayoutInflater;
import android.view.MenuItem;
import android.view.View;
import android.view.ViewGroup;
import android.widget.AdapterView.AdapterContextMenuInfo;
import android.widget.ArrayAdapter;
import android.widget.CheckBox;
import android.widget.ListView;
import android.widget.RadioButton;
import android.widget.TextView;

/**
 * @author Peter Gostincar
 */

public class ScrollFragment extends ListFragment{

  private ArrayList mItems;

  @Override
  public void onCreate(Bundle savedInstanceState){
    super.onCreate(savedInstanceState);
    getActivity().setTitle("Title");
    mItems = createSomeItems();

    CostumiseAdapter adapter = new CostumiseAdapter(mItems);
    setListAdapter(adapter);
  }
  
  
  /** implementing ContextMenu */
  @Override
  public void onCreateContextMenu(ContextMenu menu,  View view,
      ContextMenuInfo menuInfo){
    getActivity().getMenuInflater().inflate(R.menu.context_resource, menu);
  }
  
  /** registering ContextMenu*/
  @Override
  public View onCreateView(LayoutInflater inflater, ViewGroup container,
      Bundle savedInstanceState){
    View view = super.onCreateView(inflater, container, savedInstanceState);
    
    ListView list = (ListView)view.findViewById(android.R.id.list);
    registerForContextMenu(list);
    
    return view;
  }
  
  /**responding to Click*/
  @Override
  public boolean onContextItemSelected(MenuItem item){
    AdapterContextMenuInfo info = (AdapterContextMenuInfo)item.getMenuInfo();
    int position = info.position;
    CostumiseAdapter adapter = (CostumiseAdapter)getListAdapter();
    ImagineItem i = adapter.getItem(position);
    
    //TODO operation that need to be done
    int id = item.getItemId();
    if(id == R.id.item_edit){
      //do what it's need to be done
    }
    
    return super.onContextItemSelected(item);
  }
  

  private ArrayList createSomeItems() {
    ArrayList ret  = new ArrayList();
    for(int i = 0; i < 30; i++){
      ret.add(new ImagineItem(i));
    }
    return ret;
  }
  
  /**
   * @author Peter Gostincar
   * costumise adapter to show more than just Strings
   */
  private class CostumiseAdapter extends ArrayAdapter{

    public CostumiseAdapter(ArrayList items) {
      super(getActivity(), 0, items);
    }
    
    @Override
    public View getView(int position, View convertView, ViewGroup parent){
      if(convertView == null){
        convertView = getActivity().getLayoutInflater()
            .inflate(R.layout.scroll_fragment, null);
      }
      
      ImagineItem item = getItem(position);
      
      TextView text = (TextView) convertView.findViewById(R.id.text_view);
      text.setText(item.mString);
      
      RadioButton b1 = (RadioButton) convertView.findViewById(R.id.radio_b1);
      b1.setChecked(item.mB1);
      
      RadioButton b2 = (RadioButton) convertView.findViewById(R.id.radio_b2);
      b2.setChecked(item.mB2);
      
      CheckBox cB = (CheckBox) convertView.findViewById(R.id.check_box);
      cB.setChecked(item.mB2);

      return convertView;
    }
  }

  /**
   * @author Peter Gostincar
   * class just for creating list of objects
   */
  private class ImagineItem{
    
    String mString = "Tralalal: ";
    boolean mCheckBox;
    boolean mB1;
    boolean mB2;
    
    public ImagineItem(int i) {
      mString += i;
      if(i % 2 == 0){
        mCheckBox = true;
      }
      int x = (int) (Math.random()*3+1);
      if(x == 1)
        mB1 = true;
      if(x == 2)
        mB2 = true;
    }
  }
}

menu/context_resource.xml
<?xml version="1.0" encoding="utf-8"?>
<menu xmlns:android="http://schemas.android.com/apk/res/android" >
    <item 
        android:id="@+id/item_edit"
        android:icon="@android:drawable/ic_menu_edit"
        android:title="@string/update"
        />
</menu>

activity_main.xml
<FrameLayout xmlns:android="http://schemas.android.com/apk/res/android"
    android:id="@+id/fragmentContainer"
    android:layout_width="match_parent"
    android:layout_height="match_parent" />

scroll_fragmnet.xml
<?xml version="1.0" encoding="utf-8"?>
<RelativeLayout xmlns:android="http://schemas.android.com/apk/res/android"
    android:layout_width="match_parent"
    android:layout_height="match_parent" >

    <CheckBox
        android:id="@+id/check_box"
        android:layout_width="wrap_content"
        android:layout_height="wrap_content"
        android:layout_alignParentRight="true"
        android:focusable="false" />

    <TextView
        android:id="@+id/text_view"
        android:layout_width="match_parent"
        android:layout_height="wrap_content"
        android:layout_toLeftOf="@id/check_box"
        android:padding="8dp" />

    <RadioGroup
        android:layout_width="fill_parent"
        android:layout_height="wrap_content"
        android:layout_below="@id/text_view"
        android:orientation="horizontal" >

        <RadioButton
            android:id="@+id/radio_b1"
            android:layout_width="wrap_content"
            android:layout_height="wrap_content"
            android:text="@string/radio_one"
            android:focusable="false" />

        <RadioButton
            android:id="@+id/radio_b2"
            android:layout_width="wrap_content"
            android:layout_height="wrap_content"
            android:text="@string/radio_two"
            android:focusable="false" />

    </RadioGroup>

</RelativeLayout>


Saturday 2 November 2013

Android : Creating fragment tutorial

How to create fragment in Android?

Here are two examples.
In the first we  create it from Activity class.
In the second we create it from a layout.xml file.

First Example:

package com.mamutek.adding.fragment.android;

import android.os.Bundle;
import android.support.v4.app.Fragment;
import android.support.v4.app.FragmentActivity;
import android.support.v4.app.FragmentManager;

/**
 * @author Peter Gostincar
 */

public class MainActivity extends FragmentActivity {

  @Override
  protected void onCreate(Bundle savedInstanceState) {
    super.onCreate(savedInstanceState);
    setContentView(R.layout.activity_main);
    
    FragmentManager fm = getSupportFragmentManager();
    Fragment f = fm.findFragmentById(R.id.fragmentContainer);
    
    if(f == null){
      f = new MainFragment();
      fm.beginTransaction()
        .add(R.id.fragmentContainer, f)
        .commit();
    }
  }
}

package com.mamutek.adding.fragment.android;

import android.os.Bundle;
import android.support.v4.app.Fragment;
import android.view.LayoutInflater;
import android.view.View;
import android.view.ViewGroup;
import android.widget.TextView;

/**
 * @author Peter Gostincar
 */

public class MainFragment extends Fragment{
  
private TextView mText;
  
  @Override
  public View onCreateView(LayoutInflater inflater, ViewGroup parent, Bundle savedInstanceState){
    View v = inflater.inflate(R.layout.fragment_main, parent, false);
    
    mText = (TextView) v.findViewById(R.id.textView);
    mText.setText("From Activity");
    
    return v;
  }
}
activiti_main.xml
<FrameLayout xmlns:android="http://schemas.android.com/apk/res/android"
    android:id="@+id/fragmentContainer"
    android:layout_width="match_parent"
    android:layout_height="match_parent"
    />

fragment_main.xml
<?xml version="1.0" encoding="utf-8"?>
<LinearLayout xmlns:android="http://schemas.android.com/apk/res/android"
    android:layout_width="match_parent"
    android:layout_height="match_parent"
    android:orientation="vertical" >

    <TextView
        android:id="@+id/textView"
        android:layout_width="wrap_content"
        android:layout_height="wrap_content" />

</LinearLayout>


Second Example:

package com.mamutek.fragment.from.xml;

import android.os.Bundle;
import android.app.Activity;
import android.support.v4.app.FragmentActivity;
import android.view.Menu;

public class MainActivity extends FragmentActivity {

  @Override
  protected void onCreate(Bundle savedInstanceState) {
    super.onCreate(savedInstanceState);
    setContentView(R.layout.activity_main);
  }
}

package com.mamutek.fragment.from.xml;

import android.os.Bundle;
import android.support.v4.app.Fragment;
import android.view.LayoutInflater;
import android.view.View;
import android.view.ViewGroup;
import android.widget.TextView;

/**
 * @author Peter Gostincar
 */

public class MainFragment extends Fragment{
  
  private TextView mText;
  
  @Override
  public View onCreateView(LayoutInflater inflater, ViewGroup parent, Bundle savedInstanceState){
    View v = inflater.inflate(R.layout.fragment_main, parent, false);
    
    mText = (TextView) v.findViewById(R.id.textView);
    mText.setText("From Layout");
    
    return v;
  }
}
activiti_main.xml
<fragment xmlns:android="http://schemas.android.com/apk/res/android"
    android:id="@+id/fragmentContainer"
    android:layout_width="match_parent"
    android:layout_height="match_parent"
    android:name="com.mamutek.fragment.from.xml.MainFragment"
    />
fragment_main.xml
<?xml version="1.0" encoding="utf-8"?>
<LinearLayout xmlns:android="http://schemas.android.com/apk/res/android"
    android:layout_width="match_parent"
    android:layout_height="match_parent"
    android:orientation="vertical" >
    <TextView
        android:id="@+id/textView"
        android:layout_width="wrap_content"
        android:layout_height="wrap_content" />
</LinearLayout>

Android : The scroll list tutorial

For make scrollable list fragment in Android!
MainActivity class is hosting the ScrollFragment class which extends ListFragment.
The commented code in public void onCreate(Bundle savedInstanceState) method is usable when we wanna just show the list of the strings. To achieve that you have to override the toString() method in Item class.

If we wanna intersect the on click listener we override method public void onListItemClick(ListView l, View v, int position, long id), and in layout (xml) set all focusable objects to  android:focusable="false".

With CostumiseAdapter which extends the ArrayAdapter<T>, is possible to display also other stuff.
You can get all code include xml files in Peter Gostincar Android.
This is the result of the following code.


package com.mamutek.com.contact.intent;

import android.os.Bundle;
import android.support.v4.app.Fragment;
import android.support.v4.app.FragmentActivity;
import android.support.v4.app.FragmentManager;
import android.view.Menu;

/**
 * @author Peter Gostincar
 */

public class MainActivity extends FragmentActivity {

 @Override
 protected void onCreate(Bundle savedInstanceState) {
  super.onCreate(savedInstanceState);
  setContentView(R.layout.activity_main);

  FragmentManager fm = getSupportFragmentManager();
  Fragment f = fm.findFragmentById(R.id.fragmentContainer);

  if(f == null){
   f = new MainFragment();
   fm.beginTransaction()
   .add(R.id.fragmentContainer, f)
   .commit();
  }
 }
}

package com.mamutek.scroll.list.android;

import java.util.ArrayList;

import android.os.Bundle;
import android.support.v4.app.ListFragment;
import android.util.Log;
import android.view.View;
import android.view.ViewGroup;
import android.widget.ArrayAdapter;
import android.widget.CheckBox;
import android.widget.ListView;
import android.widget.RadioButton;
import android.widget.TextView;

/**
 * @author Peter Gostincar
 */

public class ScrollFragment extends ListFragment{

 private ArrayList mItems;

 @Override
 public void onCreate(Bundle savedInstanceState){
  super.onCreate(savedInstanceState);
  getActivity().setTitle("Title");
  mItems = createSomeItems();
  
  //*****this will show only Strings *****//
//  ArrayAdapter adapter = new ArrayAdapter
//         (getActivity(),
//         android.R.layout.simple_list_item_1,
//         mItems);
  CostumiseAdapter adapter = new CostumiseAdapter(mItems);
  setListAdapter(adapter);
 }
 
 @Override
 public void onListItemClick(ListView l, View v, int position, long id){
  Item item = (Item)(getListAdapter()).getItem(position);
  Log.d("TRA" , item.toString());
  //the item is clicked Object on the list...
 }

 private ArrayList createSomeItems() {
  ArrayList ret  = new ArrayList();
  for(int i = 0; i < 30; i++){
   ret.add(new Item(i));
  }
  return ret;
 }
 
 /**
  * @author Peter Gostincar
  * costumise adapter to show more than just Strings
  */
 private class CostumiseAdapter extends ArrayAdapter{

  public CostumiseAdapter(ArrayList items) {
   super(getActivity(), 0, items);
  }
  
  @Override
  public View getView(int position, View convertView, ViewGroup parent){
   if(convertView == null){
    convertView = getActivity().getLayoutInflater().inflate(R.layout.scroll_fragment, null);
   }
   
   Item item = getItem(position);
   
   TextView text = (TextView) convertView.findViewById(R.id.text_view);
   text.setText(item.mString);
   
   RadioButton b1 = (RadioButton) convertView.findViewById(R.id.radio_b1);
   b1.setChecked(item.mB1);
   
   RadioButton b2 = (RadioButton) convertView.findViewById(R.id.radio_b2);
   b2.setChecked(item.mB2);
   
   CheckBox cB = (CheckBox) convertView.findViewById(R.id.check_box);
   cB.setChecked(item.mB2);

   return convertView;
  }
 }

 /**
  * @author Peter Gostincar
  * class just for creating list of objects
  */
 private class Item{
  
  String mString = "Tralalal: ";
  boolean mCheckBox;
  boolean mB1;
  boolean mB2;
  
  public Item(int i) {
   mString += i;
   if(i % 2 == 0){
    mCheckBox = true;
   }
   int x = (int) (Math.random()*3+1);
   if(x == 1)
    mB1 = true;
   if(x == 2)
    mB2 = true;
  }
  
  @Override
  public String toString(){
   return mString;
  }
 }
}
<?xml version="1.0" encoding="utf-8"?>
<RelativeLayout xmlns:android="http://schemas.android.com/apk/res/android"
    android:layout_width="match_parent"
    android:layout_height="match_parent" >

    <CheckBox
        android:id="@+id/check_box"
        android:layout_width="wrap_content"
        android:layout_height="wrap_content"
        android:layout_alignParentRight="true"
        android:focusable="false" />

    <TextView
        android:id="@+id/text_view"
        android:layout_width="match_parent"
        android:layout_height="wrap_content"
        android:layout_toLeftOf="@id/check_box"
        android:padding="8dp" />

    <RadioGroup
        android:layout_width="fill_parent"
        android:layout_height="wrap_content"
        android:layout_below="@id/text_view"
        android:orientation="horizontal" >

        <RadioButton
            android:id="@+id/radio_b1"
            android:layout_width="wrap_content"
            android:layout_height="wrap_content"
            android:text="@string/radio_one"
            android:focusable="false" />

        <RadioButton
            android:id="@+id/radio_b2"
            android:layout_width="wrap_content"
            android:layout_height="wrap_content"
            android:text="@string/radio_two"
            android:focusable="false" />

    </RadioGroup>

</RelativeLayout>